Is your movie-collection starting to fill up the hard-drive? Or do you just want more space? This guide is designed for those of you who don’t want to send your XBOX away and pay money for a hard-drive exchange – when you can do it very easily yourself :) ! This requires an XBOX with a modchip installed!
The basic steps to a successful hard-drive exchange are to open the XBOX, take the old hard-drive out, put the new one in, close the XBOX again and finally format the new hard-drive. To open the box, you will need a set of Torx screwdrivers (size 10, 15 and 20) – so make sure you have those close-at-hand before beginning. Usage of an anti-static cable is not necessary but highly recommended – you don’t want to kill your XBOX in such a pointless way, now do you ;) ? Also, make sure there is no DVD or CD inside the DVD-drive!
The XBOX only supports 3.5″ hard-drives with the IDE interface and with less than 300GB’s of storage. The speed of the drive (RPM) does not matter, although I recommend using running at 7200RPM – simply because it’s faster ;) . Also, choose a drive which runs fairly cool and silent as the XBOX case doesn’t give better isolation than a regular PC case. Before you plug the power out of your XBOX, make sure you are able to do all the steps required within 4-5 hours. If the XBOX is without power for more than that time, its internal clock will lose power and you won’t be able to boot off a DVD until you’ve reinserted the old hard-drive and started the XBOX once. Believe me, I learnt this the hard way :( !
This requires an XBOX with a modchip installed!
The images in this article are all taken from Piratbyrån’s great article about the same subject (in Swedish).
Opening the case

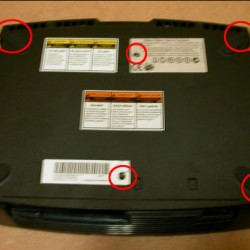
Turn your XBOX upside down and locate the six screws you need to unscrew. Two of them will be under the two warranty stickers whilst the four others are under the rubber pads. The screws are under the outermost parts of the rubber pads, and usually you will not need to remove the whole pad to reach them.
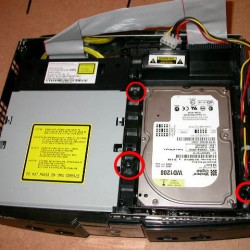
After unscrewing all screws, turn the XBOX back on its feet and carefully lift the case straight upwards. What you now see in front of you is the big grey DVD-drive and the white original hard-drive. The big flat grey cable is the IDE-cable, that which connects both drives to the motherboard. Gently pull this cable out of the hard-drive without twisting it too much. The white plug with the black, yellow, red and white cables is the hard-drive’s source of power. This is usually pretty difficult to pull out, and if you’re unsuccessful with it proceed to the next step.
Take the hard-drive out

See the black plastic “frame” that is encapsulating the hard-drive? You need to unfasten this and remove it from the motherboard before taking out the hard-drive. Look at the picture to the right, these are where the screws are located – you know what to do! After unscrewing, make sure the hard-drive’s power-cord is not tucked into the black frame and slowly lift the frame straight upwards, making sure nothing is being forcefully bent or pulled. Unscrew the screws on the side of the frame (four of them in total) which hold the hard-drive in place and take the drive out. If you haven’t disconnected the power-cord, now is a good time to do so.
Put the new hard-drive in and close the case
Fasten your new hard-drive in the black frame and make sure the IDE- and power-cords are correctly and fully inserted. When you’ve put the black frame back, you don’t really need to screw it to the motherboard unless you often dance with or otherwise shake your XBOX a lot :D . Put the case back on, fasten the screws and plug your XBOX in. What you now have is an XBOX with a lot of storage but without any operating system to run off. The following guide will cover preparing your hard-drive using Auto-Installer Deluxe, if you wish to use anything else it is your free choice!
Leave a Reply